When you’re an Eco Design Advisor whose job it is to help others to make their homes comfortably and cost-effectively liveable, you know just what to do when you turn your own damp dwelling into a warm and energy-saving family home.
‘WOODEN TENTS’ was the phrase a colleague used to describe much of New Zealand’s housing stock when I first became the Eco Design Advisor (EDA) for Palmerston North City Council 7 years ago. What he meant was a shell that more or less keeps out wind and rain but offers little other protection from the elements – primarily temperatures both high and low.
The phrase has stuck with me as I’ve visited thousands of such tents around Palmy and the lower North Island advising occupants how to improve their health and comfort on a budget that suits. At the same time, I’ve been slowly retrofitting my own family’s 1935 bungalow.
It’s been a unique and valuable experience, with my work in each sphere informing the other. After 7 years, improvements to the bungalow are nearly complete and the former tent has become a cosy home that uses a fraction of the energy it once did.
The EDA process
It’s impossible to describe how challenging and rewarding my job as an EDA is. It involves the diagnosis of unwell buildings, creative problem solving, clear communication to clients from across society and many cups of tea.
What’s most satisfying is knowing that, by providing completely independent advice, I’ve helped each household begin or advance their own retrofit journey.
The big picture approach I take with clients is based on budget, aesthetics and lifestyle – recognising that every household will have a different formula of these three components and that success can be achieved in different ways.
I provide advice on moisture management, heat retention, heat distribution and space and water heating, usually in that order. I’ve taken the same approach in my home.
Case study – retrofitting a 1930s bungalow
The transformation of our bungalow provides an ideal case study in the cumulative effects of many small interventions (see Table 1). It also strives for the most benefits at the least cost and minimum material relegated to landfill – a strategy I call eco-thrifty renovation.

Water, water everywhere
The home was damp when we bought it, primarily due to poor drainage and inadequate subfloor ventilation. Water from both the yard and drive flowed underneath the structure, and several of the H5 piles under the relocated bungalow were rotting after just 30 years. Additionally, there was very little subfloor ventilation due to landscaping covering most of the vents.
Diverting water away from the house involved a French drain installed along the high side of the house as well as cutting channels in the concrete car park. After this work was complete, a ground moisture barrier was installed although it took about 18 months for the home to fully dry out.
Fortunately, the bathroom already had a powerful 150 mm diameter fan and a delay timer on the switch. Nonetheless, I installed a shower hood, and currently we get no condensation in the bathroom unless the children have a particularly long play in the bath.
Thermal envelope first steps
Within a week of our purchase in August 2014, I had a delivery of R3.6 blanket insulation. It turned out I had overordered, but I used the excess to cover the ducting of the existing heat transfer system. This simple retrofit turned out to be one of the best of the entire project (see Table 1).
Soon after, I ordered detachable curtain linings for the existing unlined curtains as well as lined Roman blinds for the kitchen and dining areas. Subfloor insulation was considered less urgent and had to wait a year or two.
Although much of this can be considered standard for retrofits, the ways I addressed heat loss through glazing and walls goes deeper.
| BEFORE RENOVATIONS | AFTER RENOVATIONS |
|---|---|
| Minimal ceiling insulation ~ R1.0 | R3.6 blanket top-up ~ R4.6 |
| No underfloor insulation | R1.8 |
| Single glazing | 90% double or secondary glazing |
| Standard unlined curtains and blinds | Added linings to all curtains and blinds |
| Uninsulated walls | 25% of walls insulated – mostly south facing |
| Major drainage issues and damp subfloor | French drains, polythene ground covering, ventilation |
| Bathroom extractor fan on timer | Added a shower hood |
| Relative humidity 65–80% | Relative humidity 50–65% |
| Wood burner heated lounge only | Wood burner heats entire home easily |
| Standard heat transfer – 3 bedroom | Super-insulated heat transfer |
| Overnight indoor temps below 10°C | Winter 2021 indoor low 14.5°C |
Table 1 Retrofits to the 1930s bungalow
Double and secondary glazing added
At present, nearly all the French doors (four sets) and windows have either double glazing or Perspex secondary glazing. This choice goes to the heart of the budget-aesthetic-lifestyle formula along with my observations of the performance of secondary glazing over the last decade.
With timber windows that have secondary glazing applied internally, I’ve observed that moisture can get between the panes after a hard rain to the windward. It can take days to dry out or even weeks unless the panel is removed.
Therefore, my practice – and recommendation to clients – is to use secondary glazing for timber glazing only where wind-driven rain will not reach the putty, such as in recessed entryways, covered decks or carports. Otherwise, I consider the best choice is to retrofit double glazing with low-E glass.
The window from our dining nook to the carport even has triple glazing with layers of Perspex applied internally and externally as the outside face receives neither rain nor direct sunlight that could degrade the panel.

Walls insulated by adding extra layer to wall
For wall insulation, I carefully chose walls that could be insulated without penetrating the internal or external linings. This was done by packing off 60–80 mm on the inside face with framing timber and insulating between with polyester batts.
The four completed walls are finished with:
- a timber feature wall in the master bedroom
- a plywood climbing wall in the kid’s room
- plasterboard in a small office
- thin ply in two large closets along the south wall.
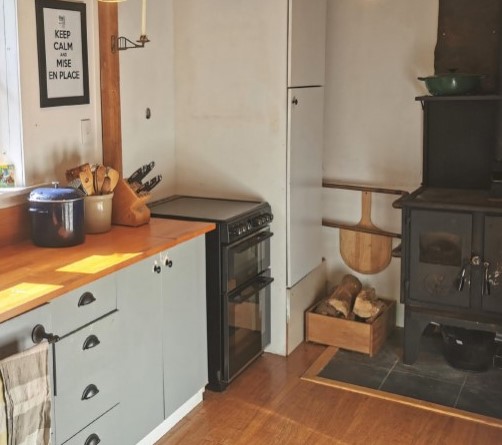
Insulating heat transfer systems
Heat transfer systems for homes with wood burners are good in theory but in most cases are gross underachievers.
LONG LENGTHS OF POORLY INSULATED DUCTING
On more than one occasion, I’ve been told by clients ‘it just blows cold air into the bedroom’. This appears to be due to long runs and minimally insulated ducting.
Even if a home has R5.0 or R6.0 ceiling insulation, the ducting is typically only R0.6 and also usually runs on top of the ceiling insulation. While air on the ceiling of the lounge may be above 30°C, it’s possible that it could fall to the teens before reaching the bedrooms. Thus, it has a net cooling effect on the home.

INSULATE DUCTING TO IMPROVE PERFORMANCE
Retrofitting for better performance can be quick, easy and inexpensive. Where the ducting lays flat, I covered it with R3.6 blanket. Where it connects to the suspended fan, I double wrapped each side with polyester underfloor insulation and taped like a whiskey barrel (see drawing above).
The difference was immediate and substantial.